Showing posts with label sewing. Show all posts

Saturday, June 8, 2013

Thrifted Sheet becomes "Deconstructed" Nightie

Some time ago I discovered a fitted sheet at the thrift store made of 100% cotton and thought for $3.00 it would make a heck of a lot of nightgowns.

Well, I've finally gotten around to sewing with it.  This is the first one and there is plenty of material left over, so I'm going to make at least one more.

This design I created last year (or maybe the year before) for the express purpose of surviving the oh so enjoyable night sweats that come with being peri-menopausal.  I was not looking for fancy or stylish and this is certainly neither.  What it is though, is perfect for my needs.  Cotton breathes and it also cools, which anything with a man made content doesn't.  The design is loose, which also helps with the cooling.  I intentionally left off any collars, facings, etc.  All that does is add layers and warmth when none is needed.

I started by taking a tank top that I like the fit of and creating a paper pattern from it by tracing around the tank, which I had folded in half along the center.  The center front and center back of the pattern pieces are laid on a fold of fabric so there are only two pieces, no center seams.  Because knit (the fabric of the tank top) stretches and cotton does not, I added one inch to each center seam (extending the neck line and hem and making new center seams.

Next you need to figure out the length you want.  Lots of ways you can do it, but here is what I did: Use a tape measure to measure from shoulder to just above the knee.  Transfer that to the pattern by laying your tape measure on the pattern and drawing a new hem line.  I just made mine straight, skipping the traditional curved hemline.

Next, cut out your pattern pieces - there are two.  I serged this entire nightgown.  Start with the necklines. Then serge the shoulder seams together.  Serge around both arm holes.  Next serge one side seam.  Leave the other one till later.  Serging in this order will enclose as many edges as possible in a serged seam, leaving very few tails to trim.  One note: It is somewhat tricky to serge around curves.  My best advice is to practice.

I added the ruffle because I think it's slightly more feminine and since the thing is so plain, I thought it needed something.  To make the ruffle, I cut a piece of sheeting that was 1 1/2 times the width of the finished nightgown by 3".  I serged one long edge.  Then I adjusted the differential feed on my serger until I got a ruffle I liked on scrap material (use the same material you will be making your finished ruffle with because the weight of the fabric plays greatly into the finished product.  See this very helpful serged ruffle tutorial from Sew, Mama, Sew! which will explain the adjustments to ruffle.  My ruffle is not very full.  If you want a fuller ruffle, it may require more fabric.

Once your ruffle is complete, it's time to serge it onto the hem.  Adjust your machine settings back for standard serging and put the nightgown on the bottom and the ruffle on top - right sides together.  Now this will take some fidgeting and adjusting as you are serging to combine these two pieces.  Oh, important information:  Before starting this step measure your ruffle against the nightgown to make sure your ruffle is long enough.  If it isn't, DO NOT WORRY.  You will just need to make a little more ruffle and serge it to the longer piece.  Guess how I know this...  Anybody, Anybody?!

Once your ruffle is attached, it's time to serge the last side seam.

Using my regular sewing machine, I added some pleats to the front neckline because this sheeting fabric has some body to it, which made the neck stick out rather than lay against my body.  The pleats draw it in so it lays flat.  I also added some clear elastic to the shoulder seams because someone cut the shoulders a little too wide.  The elastic is wonderful for addressing this without having to re-serge!
 That's it.  All done.  I like the serged edges so I left them au naturel.  It's cool, lightweight and comfortable.  Plus the pattern is so simple that making a bunch is easy peasy.  That way there is always a fresh nightie!

Happy Saturday one and all.

Saturday, February 9, 2013

Red Rover, Red Rover...

This vest is very red.  My son says "Intense" and his eyebrows raise just a little too high, if you know what I mean.  But, I like it.  It's made with a Butterick pattern that was clear, easy to follow, had very fine results.

Mind you, I tweaked the pattern.  I cannot help it.  I almost never follow a pattern from begin to end without a variation and this was no exception.  I decided to forgo using the facing.  This pre-quilted fabric is stiff.  I felt like two layers of that would be very like wearing cardboard.

So, what to do, what to do.  The pattern called for using bias tape on the arm holes.  I decided to outline the entire vest in bias tape.  I was originally going to use a pin dot fabric and I made miles and miles of bias tape, but in the end I just couldn't do it.  I don't know why exactly, normally I love any sort of polka dot, but not today and not with this vest.  So, I bought packaged bias and it is good.

Have you worked with pre-quilted?  Well, you end up with some pretty unattractive seams inside with all that white fleece hanging out.  Originally, I was going to use some of the miles of pin dot to enclose the seams.  See previous paragraph.  As I sat on my sewing chair contemplating life I spotted some bargain bin ribbon I bought a year ago.  Using it to encase the seams does two things:


First, it hides the white fluff.  Second, because I stitched it down through the garment, I ended up with these lovely wide 'top-stitching'.  Oh, and a third thing it does is I know there is silver inside.  It's like a sparkly little secret that only I know.  And now you know.

Oh, see the zipper pull?  It came off an after Christmas bargain bracelet at the grocery.  I took it apart and this was one component.  I just added a jump ring to attach it to a small lobster clasp.

Here's what's funny about all the pictures...  They do not look like they are the same vest, with all the color variations.  Oh...  I love my camera. You just never know what's going to happen.  hee hee.

Just in time for Valentine's ♥


Anyway, Butterick #5683. I recommend!

Saturday, February 2, 2013

The Best... An inflammatory thought

Ever noticed how when someone tells you or you read that something is "The best" it kinda gets your dander up?  Why is that?

Is it because we don't think anyone else should be deciding for us just what is best?  Is it because we think the label-er can't possibly have any idea what's good let alone what's best?  Is it because we wanted to be the one to say it first?

I don't particularly know the reason, but I catch myself doing it sometimes.  I suppose I think that what is best is very personal and very subjective.  So subjective in fact that one day I think it's the best and on another I might just think it's okay.

So, I bet you are wondering what has brought this on...  Well, I've found something that really is the best and I want to share it with you:


They are Wonder Clips by Clover.  OMG!  I've been making a vest from prequilted fabric and I've used these instead of pins.  The are amazing.  Maybe you've already seen them.  I just discovered them and this is my first project.  I used them to hold on the bias tape that I used to enclose every exposed end.   I used them to hold the zipper in place.  The zipper doesn't shift or bubble as sometimes happens with pins.  No getting stuck when maneuvering the fabric through the sewing machine.  The clips remain firm, but are easily removed or re positioned with one hand.  Woo Hoo!  They are the best!  hee hee

Buy the big box.  It's pricey, but totally worth it!

Friday, January 25, 2013

Pattern Weights

Before we get into it...  let's just for a moment celebrate the number of posts this year. Yes.

Okay, on Pinterest I found a picture of pattern weights and immediately flew back to my tween years, watching my Aunt cutting out patterns in her basement, using pattern weights.  This was in the mid 70's.  My Aunt was on the cutting edge.  hee hee.  Get it, 'cutting'.  Whew, I'm a funny girl.

Anyway, I thought to myself, 'I gotta get me some of those'.  Pinning the pattern is among my least favorite parts.  This pinner had used washers and large nuts, which she wrapped in fabric.  So, off I went to the hardware store to buy some washers.  (If I'd remembered to take pictures before I started, I'd insert one here...)  I bought a variety of sizes.  The larges ones have a 2 1/2" diameter, the smallest 1 3/4" diameter. I also bought 2" diameter washers.  The smaller washers I purchased in packs of 10.  I bought 2 packs.  The smallest and largest ones I bought individually, because that's all they had.

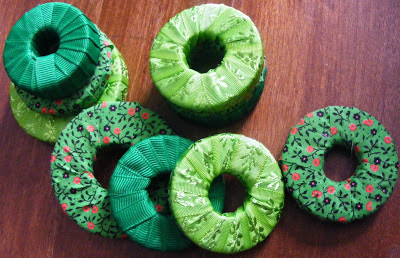
I ended up using ribbon to wrap mine because I did not want to finish the edges of fabric strips.  Ribbon is more instant satisfaction!  I stacked them by twos or threes and wrapped, wrapped, wrapped.  It's not hard, just takes some time.  I did not glue the beginning, I sandwiched the end between two of the washers and then overlapped the first wrap to keep it secure.  How to secure the end?  I pondered all of my choices and tried a couple before settling on hot glue.  The other glues I tried just didn't dry fast enough and holding the ribbon while it dried was harshing my mellow.  So, hot glue won.  One tip, the glue cools fast on the ribbon because of the metal washers so plan to work quickly.

Are you wondering if they work?  Well, they do.  I have successfully used them to cut out a fleece jacket, which just might show up on this blog!   If you are working on a complicated pattern and need the pieces to stay attached, you can still use a pin for that!

By the way, I spent $9.59 on washers and used left over ribbon in my studio which made 10 weights.  It's a bargain, even if you'll be buying ribbon, too.  I used about a yard of ribbon for each weight.  About.  It can vary greatly depending on the washers you are using, how many you are stacking together and what kind of ribbon you are using.  Try one first before cutting the ribbon!  The widest ribbon I used was 1/2".  I tried using a wider ribbon but it just bunches up in the middle and looks terrible.  The grosgrain is very thick and is therefore less flexible and it took more ribbon to cover.  The lime ribbon was the best for this application as it is very supple and molded itself to the washers.  The green floral came to me in a box from my mother in law.  It's not actually ribbon as the edges are unfinished.  I think it might have had some adhesive on the back, once...a long time ago.  There was no wrapping or packaging, so it's anyone's guess.  But it looks pretty great as a pattern weight.

I actually think I might need more.


Monday, April 2, 2012

Senior Recital Vest

My oldest is a musician and had his senior recital Saturday. First, little surreal that is graduating college this year. But that is another post, I think. This post is about the vest...

Some time ago, we found this fabric at JoAnn's. It really is the most beautiful fabric, with big elaborate paisley shapes in silver and black. The photos do not do it justice. It's shimmery rather than shiny and with all the intricate stitching it catches the light with every movement. He thought it would make a great vest and so we purchased. I'd intended to give it to him earlier, but with one thing and another (the broken arm, primarily), it was set aside.

As he is away at college most of the time, getting new measurements is more tricky than it ought to be. Okay, okay, so I don't always remember everything either. Anyway, he was home on spring break two weeks ago, so I measured, on Sunday as he was leaving to go back to school, but the important part of this story is I remembered to measure while he was still in the house. As he is a tall bear of a man, standard patterns just don't work. I did find a big and tall pattern a year or two ago and with a few alterations, we were good to go. The vest pattern called for a middle back seam, but because the pattern of the fabric is so distinct (and beautiful) I did not want that, so I fiddled with the placement of the back piece on a fold to create the least extra fabric. It worked out really well actually.

I'm not a professional seamstress and the only class I've taken was 7th grade Home Ec. All I know about sewing I've learned from books and television programs and trial and error. So every time I have a success, I feel ecstatic.

Anyway, the point to this story is that the vest turned out great. My son looked great and most importantly, he felt good in it.

Oh the recital? It was the most amazing... You know, there are events that change who you are and who you will become... That recital was one of those events for my son. He was challenged in a way that he did not think he could accomplish. To watch him do something he thought was beyond his reach... I knew I was witnessing a miracle.

Thursday, November 10, 2011

30 Project Update

So, I was looking back at the posts and realized that I never finished documenting the projects I completed this year. Partly because I'm a nerd and don't always remember to take a picture before I give the gift away and partly because my amazing son is using the camera for school. I'm way over the 30 projects for the year (not even counting the multiples of items like the crochet angels or eyeglass cases. I also extended my creativity to try projects I've never tried before... Including, but not limited to, lotion from scratch (really interesting and fun - but boy is there a science to scent), fermented pickles (quite spicy thanks to a jalapeno or three, but not sour enough... hmmmm) and candles. It's been a fun year of projects and the studio is thankful that things are moving in and through it! Here is a list of other projects completed but not documented by camera: #26 Patchwork skirt, #27 Gray knit shirt, #28 Red, cream & black A-line skirt, #29 Beaded Earrings, #30 Pink Skirt. I'm happy to report that all of these were completed before our vacation in July as I took them with me. So, the 30 projects project was completed in July. Yeah.

Monday, August 22, 2011

Project #25 Shirt


This shirt, which has become my summer favorite, was made from a shower curtain. Seriously. At my local thrift shop, I discovered this shower curtain, made from the softest, sheerest cotton with sequins and beads sewn along one row of paisleys. I knew it would make a great shirt. I was originally thinking about a long sleeve tunic, but the curtain had two seams which made pattern placement tricky. Because the fabric hadn't been washed before becoming the shower curtain, the seams were a little wonky and I just didn't want them in the finished shirt. So sleeves were out. Instead, this tunic/shell was born and lucky it was, too, as we had the hottest July I can remember and I didn't wear a single shirt with sleeves the entire month ;-)

This little project, completed in about an hour, combines two of my very favorite things... handmade and re-purposed. I have a table cloth with a stain that is destined to become a nightgown... Stay tuned!

Project #24 Dress


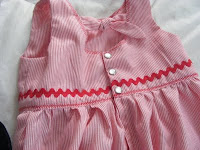
Well, it's been so long since I updated this blog that I don't remember the exact timing of the finished projects... But that's not important is it? This little dress is from a McCall's pattern for a sweet girl who turned 1 in May. I used snaps in the back instead of buttons and love the way they turned out. I thought it looked a little plain, so added rick rack and some decorative stitching (which did not turn out perfect, but...) The red and white stripes are perfect for a summer frock and the rick rack -well rick rack is fun, isn't it. I used the blind hem to hem the dress. As I've said before, the blind hem though tricky, makes a finished garment look fantastic. It also improves the way the garment hangs. If you've never tried it or been frustrated by it, it's worth the time and effort. Practice, trying out the textbook instructions, then tweaking it until it's your own. Once you've successfully done it, you will understand my love for it!

Sunday, March 20, 2011

Project #22 Purse Accessories


Yes, I've gone a little crazy. But, these accessories are so quick and simple to create that it's crazy not to ;)

Tissue cover: I used the hem of the shirt sleeve to create the 'ribbon' accent.

Eyeglass case: This is the shirt sleeve, minus the hem.

Checkbook cover: I used a small piece left from the sleeve, which happened to be on the bias to make the ribbon accent.

I am seriously amazed at how much I've created from less than half a shirt. I still have the entire back of the shirt, part of the right front and one sleeve. Shoot, I can probably make a new shirt from all of that!

If you want to make purse accessories, you can search the web for tutorials or you can just jump in with both feet. These don't require a lot of material, so if you goof, try again. I love fooling around with these kinds of projects. Useful, simple, fun.

We are enjoying our fourth day of sunshine. In a row. This is something to celebrate after the intense winter. May you also be experiencing something to celebrate!

Saturday, March 19, 2011

Project #21 Shirt Purse


Okay, before you say anything... I love this purse. I realize that a shirt purse is not everyone's cup of tea, but using the details from the clothing makes the purse interesting. Plus, it's quirky in a way that appeals to my sense of humor.

The other day my favorite hubby was cleaning out the closet of items not worn and this terrific shirt made it into the pile. He started to explain to me why he wasn't keeping it, but I said "No worries, I'll use it in my studio." The minute he said it was to go, I saw a purse! I have always loved red, white and blue and something about this shirt just screamed purse.

So, I've been looking at and thinking about that shirt for a few days... Pondering how to cut, what to keep, etc. I wanted the button placket for sure and I thought a pocket would be cool, but I didn't want both pockets. So yesterday I decided to cut... From just beside one pocket across the placket, including the pocket on the other side all the way to the sleeve, which was the most I could get from the front without using the other pocket. It looked cool, but it just wasn't quite enough.

So, this morning I thought "I'm adding some denim". I mean what goes better with a comfy shirt than an old pair of jeans? These were my oldest son's and were a 'carpenter' style. They have this long skinny pocket on the back and with a few modifications, it's perfect for my cell phone! I lined it with a scrap from the shirt and then tacked the corner down so the plaid shows through.

Once I added the denim to the shirt it was a perfect size. I boxed the corners and made tabs and handles from pieces of the shirt and jeans. The lining is a solid red and I used polyester felt between the layers to add body and softness. It's a shame the handles don't show more as they are fun. Denim on top, with shirt plaid on the inside.

This has been a great day and I have a fabulous new purse!

Friday, March 18, 2011

Project #20 Cowboy Drawstring Bag


In the spirit of "Celebrate the Boy" which is a great idea from this blog, here is one of my favorite gift ideas for kids. A drawstring bag, or sack pack or gym sack. There are a myriad of names, but no matter what you call it, it's useful and fun. Everybody needs a place to keep their stuff! And if you can carry it and keep your hands free, even better!

I like to line these bags. They are sturdier and it gives the grommets four layers to grab onto. This one is lined with muslin and the applique star is made from a faux suede.

Monday, March 7, 2011

Project #18 Daisy Vest


Have you ever seen "Please Don't Eat the Daisies" with Doris Day and David Niven? Well it's a good one and when I saw this fleece in the remnant bin, I could hear the Amazing Ms. Day singing the title song.

The blue is very vivid and the gingham centers... well, I love it.

Today has been a really interesting day. Through my local public library I have access to online 'courses' that cover a wide range of topics, from learning basic computer skills to learning a new software program to taking placement tests or practicing for entrance testing. It's pretty incredible. In the comfort of my own home, I've spent the afternoon learning skills that will improve my life at work. It's a go at your own pace and you can pause or repeat the information as much as necessary. It's pretty amazing.

I believe that public libraries, public education, free radio, free television and now the Internet, which are all ways of freely disseminating information and knowledge, hugely contribute to to the very fact that it is possible for each of us to voice opinions in opposition of our neighbors, our employers, our government. Knowledge is power after all. When I see the tragic battle that other countries go through to be free, to be heard, to be valued... at the same time I am saying a prayer for them, I am saying one of gratitude for this perfectly imperfect country and my blessed life here.

Friday, March 4, 2011

Project #16 Eye Pillows


Eye pillows! In a previous post I described how to make these wonders and I highly recommend that you do. I've been giving these as gifts and they've been a big hit. So these three are to replenish my stash! I believe everyone can use a little pampering.


Those who wish to sing will always find a song. ~Swedish proverb

Tuesday, March 1, 2011

Project #15 Wristlets


Yes, yes, yes. Another purse project. I love them. They are fun to make and can be as wild or as subtle as your mood strikes you.

This is my first foray into wristlets. I just started with some cotton thread and improvised until I felt they were finished. I made the pink one first, but in the end thought it looked pretty old lady-y (this is primarily due to the color combination I think). Despite the fact that my children think I'm an old lady, I do not want my wristlet to say as much.

Besides, I wanted to try slightly larger dimensions and I wanted more of the fabric to show above the crochet. So, out came the green thread and voila! I'm pretty happy with the finished project. I added the besds to one side so when I'm carrying it, the beads will show and a little bead dangle for the zipper pull.

One thing I do like about the pink is the spiderweb embroidery flowers. They really are very cool and I will be using them again on a future project.

I used the green one yesterday while running errands. Very nice. I left my bigger purse containing all the things I think I might need, but actually only use a few times a year, in the car. I slipped on my green beauty and off I went. It's very convenient... when you need two hands, it politely swings around your wrist and it's perfect to hold my ID/card carrying thingy, some cash and my lip stuff. I believe I might be easily addicted.

Saturday, February 5, 2011

Pattern Alterations

Patterns that come straight out of the package may fit you the way you would like, but more often than not, a little tweaking can turn a generic fit into a great fit. I'm not talking about the super close form fit that you see on television or in movies, though you could do that if you wanted to. I'm really talking about altering patterns to most flatter your figure. For instance, the vest I finished yesterday, the main reason it didn't fit well enough is that I have a large bust. To accomodate the bust, often means my waistline is swimming in the generic patterns. One of the main reasons I make my own clothes is because I often experience the same problem with off the rack clothing. The size that fits my waist causes gapping or puckering in the bust or the size that fits my bust is too voluminous in the waist creating the oh so attractive block shape.

There are two books I highly recommend. First is this one by Palmer and Alto. It's filled with great drawings and pictures, and I find them easy to read and understand. Don't let the outdated clothing styles on the cover put you off! There are two companion books called "Pants for Real People" and "Jackets for Real People" - also great. But for general fitting of all garments, this book is a winner.


The other book is this one by Nancy Zieman. I know, you're probably thinking these books must offer duplicate information... Well some of it is the same, however there is plenty in here that is unique. Nancy has several easier to accomplish techniques that work really well for small alterations and her explanations of the process offer more insight and understanding of what it takes to alter patterns. Her confidence makes me feel confident!

Friday, February 4, 2011

Project #10 Fleece Vest.


It's been a busy day, filled with completed projects. Many were started on another day, like this vest. I started it a week ago, but when I tried it on and it was too large (and the side seams and armhole facings were already finished) I had some thinking to do before continuing. For the first couple of days I was just a little ticked. I know better than to wait to try on when the garment is mostly finished. And the really aggravating part is it's a pattern I've used before and remembered how big it ran, so took in all the pieces before cutting. But not enough! Arrrrrghhhh. Okay maybe more than a little ticked.

Then, which option to pursue... I could rip out all the finished work and take in along the sides or I could put in darts or I could run some elastic along the back, creating a gather.

So I tried pin fitting each option and it turns out I liked the elastic along the back best, but doing a small strip in the middle of the back wasn't going to be enough. So instead, I made a small belt, using 1 1/2 inches of the fleece and 1/2 elastic. I sewed the belt to the side seam and it creates a soft gather along the back, which makes an otherwise gender neutral shape a little more feminine. 'Course the fabric helps with that too ;)

You might notice that the facing is a combination of the floral and a solid pink. This is because this fleece is a remnant bin treasure. There was just a smidge over 1 yard and it wasn't quite enough for the facings, so I used a lovely pink for the armhole facings and the lower portion of the front facings.

I'm pleased with the day and the vest. This is project #10 and I'm 1/3 to my goal. * 10 projects in 17 days * While not at the pace I'd originally set, it's darn good! Oh and this vest turned out so well that I'm going to make another with (can you guess?) another remnant treasure!!! You're excited aren't you!?

Project #8 Teethers


Here is a sweet little project I found through homemadebyjill. Homemade by Jill is one of my favorites. She's very talented and as you will see, her teethers are amazing. The pattern is from therubberpunkin and she has an amazing tutorial to walk you through the steps.

This is fussy work, the eyes, the ribbons on the side, trying to turn the project right side out. Needless to say I learned a lot during this first round. Next time I will make the eyes a little larger and I will probably only use two ribbons on the sides as I like the look better. I used Jill's idea of adding something crinkly inside and love the way it sounds. I used two layers of Warm and White to enclose the plastic, which were the same size as the outside. I stitched these three layers together to avoide shifting. Then I sewed all five layers, front, back, batting, plastic, batting. Pretty thick and difficult to turn. Next time I'm going to make the batting/plastic sandwich smaller, and insert it after the front and back are sewn and turned. I'll let you know how that goes.

Funny side note... Yesterday I just happened to go to Big Lots to replenish our gift bag and tissue paper supply. I bought a collection of bags in a large clear plastic bag. When I transfered the gift bags out of the plastic bag, I knew I'd found the perfect plastic for this project. It's a little stiff and very crinkly. A quick dip in vinegar to make it germ free and it was ready to use. I love how amazing life is. Oh, the best part... The bag is huge and will last through many many many projects. amazing ;)

Thursday, February 3, 2011

Thoughts on gifts...


We have a lot of family and friend birthdays in the winter. A lot. Virtually every week from November through March, even doubling up here and there. A lot.

The picture is of my 'finished basket'. A place where completed creations rest until a birthday or other holiday comes along.

I often crochet and knit for relaxation. While watching TV or traveling or waiting for this child or that, I put yarn to hook or needles. A scarf, a baby afghan, a hat, a shawl - whatever strikes my fancy at the moment and I add it to the finished basket.

If I'm sewing an easy project, I'll often make more than one and put the extras in the basket. Easy projects are great 'assembly line' candidates.

I also occasionally get the beading bug. When that happens, I make at least two things so I can add to the basket.

Today I went 'shopping' in my finished basket and found a scarf for a friend from work who has a birthday this weekend. While I was perusing the scarf pile, I discovered a baked potato bag in the basket and decided to include it, too. Easy, stress free shopping.

All these extras become great gifts throughout the year, but especially during this time when the holidays take precedence on time and energy. I highly recommend it.

Another thing I recommend... step outside the box. I am a sucker for clearance yarn (think I might have mentioned that before). Mostly because I can try out all the different specialty yarns at much more affordable prices. Also because it get me outside the box of what I would typically purchase as far as color or texture. It's kind of a challenge too... unusual colors, maybe not enough to actually make a complete project out of one yarn so you must combine with another.

Why am I telling you all of this? Well, some people when they create things their color pallete or material choices are so focused that all their finished projects have a certain look. Branded if you will. Shopping in the clearance section gets me out of that branded-ness. It helps me to expand beyond my natural tendancies. What's really cool about that is I can almost always find something in my 'finished basket' that suits the recipient. Instead of giving away a gift that looks like me, I give gifts that look like the recipient.

Sunday, January 23, 2011

Project #6 Nightgown


I totally dig this nightgown! The fabric is a quilters flannel that I purchased on super sale last spring. I really like the color and pattern. It's busy, but the colors are muted and I think it's going to fade beautifully.

Some wonder why I make so many of my clothes... The answer is simple, I like what I like. So often, ready made items are a little short here or a little wide there. Hand made means custom. Take this nightgown, I like long sleeves... really long. When my arm is folded, I like the hem to reach just past my wrist bone. Same goes for the length, I want it all the way to the floor. I mean, it's winter, the less exposed skin the better ;). Hand made means I can customize the garments, adding a couple of inches to the sleeve and ruffle.

btw - anyone notice that this is the same lining fabric I used on the eyeglass case yesterday? Another bonus to making my clothes... the scraps :)

Saturday, January 22, 2011

Project #5 More Glasses Cases


For these, I took plain tan twill, marked diagonal lines and then used two different decorative stitches on my sewing machine to stitch along the lines. I used a thread that picked up on the blue in the flannel print of the lining fabric. I think they turned out quite fine.

I am always on the lookout for scrap projects. Since I make a lot of clothes and since there is always material left over from those projects, my scrap pile is significant. Hopefully this month will whittle that down to a reasonable size.