I am sad. Sad, sad, sad, for the tragedy today and for each and every person who is in pain because of it.
“There's no way for them to take away my sadness, but they can make sure I am not empty of all the other feelings.” ― David Levithan, Love Is the Higher Law
I found this quote and believe it is so appropriate for today. We can all make a difference to the survivors by offering our love, prayers, and support. So, for everyone connected with Sandy Hook... love.
Friday, December 14, 2012
Tuesday, December 4, 2012
Unplanned Downtime
Something happened at my office, that makes it impossible for us to work there this week. Unexpected. Shocking. Time off.
So... Can't work, what to do... what to do? Well, first on the list is cookies. It's Christmas time and my husband requested cookies this year. We've skipped the last couple of years for various reasons (last year=broken arm). I went to the store yesterday and purchased a truck load of flour, sugar, chips, vanilla, molasses, well you get the idea. I have eggs and butter on the counter to make dough, that I'll freeze for a week or two.
Next, finish and deliver some bowling ball gifts. Finished gluing yesterday. Will deliver after lunch! Totally excited to be finished with this task!
Next, design a Christmas Card for this year. We began making cards years ago when my sons were young. It was a family project, putting them together. Now I just can't seem to buy them. A few years ago, I bough some Christmas 'letterhead' on clearance, which I remembered yesterday. I just dug it out. It's pretty fantastic. At the top is an embossed snowy landscape, with some silvery snowflakes. I'm going to print something on this, cut off the bottom, mount it on paper... Well I'll post it when I get it finished. But, it's off to a good start.
Wow. It's been a while since I was a stay at home Mom and I've forgotten just how much you can get done in a day. Well, there are some other items on my list, but that's enough of a to do list for anyone out there reading this.
I'm going to close with the quote for this year's card.
“My idea of Christmas, whether old-fashioned or modern, is very simple: loving others. Come to think of it, why do we have to wait for Christmas to do that?”
― Bob Hope
Wednesday, November 21, 2012
Happy Thanksgiving
I am blessed. More importantly, I feel blessed. The older I am the more earnestly I know that what your life is depends almost entirely upon your decision to feel good about it or to feel bad about it.
It really is all about perspective.
I watched a man being interviewed after the devastation in Haiti. He'd lost his very young son. A loss he felt very deeply. However, he chose to feel blessed to have known his son. To have loved and been loved by him. He chose to celebrate is son every single day. It was powerful, humbling, and emotional.
His perspective allowed him to be thankful, grateful and loving right in the midst of the worst loss he'd experienced.
Thanksgiving is approaching and I am truly thankful for all that has been my experience. I am especially thankful for the man I love and who loves me right back.
Happy Turkey Day one and all!
Saturday, November 10, 2012
Bowling Ball Art...
I love stuff in the garden. Probably have mentioned that before. Here is the most recent bowling ball creation! Gift for a good friend. Love it!

Sunday, October 28, 2012
More than... Less than...
I was cruising the web yesterday and came across a post that was basically a rant about a famous blogger. I say rant because the post was filled with bitterness and accusations about how the famous blogger can't possibly be doing...
What this particular post said or who it was written about really isn't important. What struck me about this piece is this:
Why on earth does someone else have to be less than what they are for you to be enough? Why on earth are you comparing yourself to anyone else and deciding that you are a failure? People! Seriously!
Let's start at the beginning, you were born - therefore you are worthy of your time here on earth. You don't have to earn worthiness. You were born. You are enough. You are the only you there is. It's not your job to be anyone else, in fact you can't be anyone else. You can only ever be you. In trying to be someone else, you are still you - just you trying to be someone you aren't.
What is point being ticked someone is doing something you are not? Either you want to do it too, so get out there and do it, or you don't. In which case, why would you be ticked about people doing something you don't want to do? Seriously!
You can only ever be you AND Only you can be you. Which can either be amazing or a bitter, ranting, pity fest. You decide.
No one else has to be less than what they are for you to be worthy. Why? Because you are enough.
You are enough. Period.

This photo was taken by my amazingly talented son.
Friday, September 7, 2012
Harvest Soup

Inspired by a family member, I decided to try putting a days harvest into a pot and turning it into soup. Lots of tomatoes this year, so I filled the pot with them - skins, cores, seeds and all. I added peppers (including one very hot one), garlic and sage all from the garden. From the pantry I added two carrots, two stalks of celery, onion, peppercorns. I let it simmer for a couple of hours, removed the tomato skins and sage twig then blended it right in the pot with the stick blender.
I've never had a stick blender before and I am blown away. Easy and Amazing results! It blended all this wonderful whole foods into the tastiest tomato base. The first time I made it, I turned it into Spicy Tomato Soup, which I served with grilled cheese for a trip down memory lane. I simply added milk to the base after I let it reduce after blending. I like to call it Spicy Tomato Bisque because it sounds fancy, but it doesn't involve seafood, so therefore not truly a bisque.

I've made it a second time, this time I did not remove the tomato skins, and it blended just as well. I also cleared out the veggie drawer, adding mushrooms, zucchini and a small handful of spinach. It blended beautifully, tasted even better than the first and became Chicken Taco Soup.
We have another batch of tomatoes ready for picking and it's destined to become a concentrated base that I'm going to freeze in small zipper freezer bags. By allowing the blended soup to simmer and reduce, I'll end up with soup starter in a bag.
It's so easy, healthy and delicious! I just had to share. I hope it inspires you the way I was inspired!
Friday, July 6, 2012
Electricity
Like a million other people, we were affected by the storms and lost power for days. Thanks to my forward thinking, handy husband we have a generator and were able to power the fridge, freezer, one light, the water pump, a couple of fans, and the LED tv. We are blessed. We lost some limbs, but no damage to the house or cars. We are blessed.
There are still people without power and it's supposed to over 100 today and tomorrow. So for just a minute I'm going to focus all my positive energy in a single direction and pray that everyone is able to thrive during this time.
Last year we chose not to use the air conditioner. Primarily because it was quite old and needed frequent repairs, second because I prefer actual air, not conditioned air, third because we create a better world when we more thoughtfully use our resources. This year, we decided to replace our old unit.
Actually, we've been purposefully replacing all our old appliances and electronics to improve our houses overall energy usage. It started with the television last year, which we replaced a plasma with an LED TV. The picture quality is fantastic. The screen size is exactly the same, but the housing and weight of the TV is greatly reduced. The best part is the energy usage is less than half for the LED.
That started me thinking about what else in our house was ancient. Replacing the fridge reduced our monthly electric bill by $20 - no joke. The old fridge was more than 10 years old and was a very basic model. The new fridge, with all the modern technology, is rated at $51 dollars a year (actual usage may vary ;). $5 a month!
We've replaced light bulbs (LED's are quite expensive, but I've begun switching to them as the cost to run is so minimal); the dishwasher, and the washing machine. All of which have contributed to an overall smaller electric bill which means less energy usage.
So, we started looking at air conditioners. Last year it was pretty uncomfortable in August and this year we'd already experienced several 90 degree days. Plus, the old unit was 15 years old and we just couldn't see putting more money into it. In addition, the furnace was also 15 years old and not very efficient either. Turns out we would benefit from a whole new heating/cooling system.
After several quotes and much consideration we jumped in with both feet. There are a lot of choices and you just have to go with your instincts. My best advice: educate yourself, get more than one quote, stick to your budget, keep an open mind, trust your instincts. (Actually that advice is good for everything, isn't it?)
They came, spent two days, left us with more than we expected, wouldn't leave until we were happy - and we are. One full month into it, we are happy! It has been quite a month of high temps, storms and power outages, but every single time it kicks on, or we come into the house, we are happy. It's quiet, cool and best of all efficient. Our old unit cost us at least $100 every month we used it. This unit was just $45 for this first month. Chances are it will be higher as the summer progresses.
Friday, June 15, 2012
True Story of an Everyday Hero who Squared a Quilt!
Okay... This is going to a little difficult because I don't have actual pictures from the event. But I think it's important to document for anyone else out there who might be trying to figure out how to get a reasonably square quilt at the end of the process.
First of all, when I was making the strip quilt for my son, none of the rows were the exact same length. The way I worked the cutting of the strips was to make them all the same height, but I didn't do anything to decision the length. That was determined by the fabric and how much shrinkage occurred in the wash. Because all fabric shrinks differently and because I used embroidered panels, which were all different sizes, and because I did not want any seams to line up, the edges of the finished quilt top were very uneven.
At the point where the quilt had been quilted and it was time to sew the binding on, I absolutely had no idea how to proceed. I read every blog entry, watched every You Tube video, and checked out every available book from the library. I researched for a day and a half to no avail. No where could I find an honest discussion of what to do if your quilt top isn't magically square. Now I realize that not everyone has my inability to get the seams to line up, but come on! I don't believe for one minute that every quilter hasn't struggled with edges that are out of square at least once.
And if there is a good discussion of it, I could not find it.
Graduation is looming and I'm beginning to freak out. Though my husband doesn't quilt or sew, he is the handiest person I know and has an abundance of common sense. Sometimes I find that just by talking in through with someone else I can arrive at the solution and I was hoping this was the case this time. So I say to my husband "I need some help trying to figure out how to get this quilt square." "Ok." is his reply.
Several hours later, I'm hanging out the back door yelling into the looming darkness "I really need some help trying to figure out how to get this quilt square or square-ish". There is an element of frantic desperation in that phrase.
He comes in, looks at the quilt, I explain what needs to happen and what my thoughts are. (My plan was to tape a piece of yarn to each side of the top of the quilt, eyeball it and cut. He says why don't we just run some painters tape all the way down each side. Okay! So we do that. It doesn't look even. I adjust by picking the tape up, moving it a little and sticking it back down. My youngest strolls through, looks at it and says it isn't straight. He adjusts. I look at it - it still doesn't look straight. Hubby looks at it, adjusts the tape and then we both look at it. It just doesn't look straight.
Now, I'm going to tell you the truth, though it ain't pretty... At this point I'm on the edge. We are standing there looking at this thing, it's the night before graduation and by now it's 9:30 at night. I've been working on this quilt for two solid days and it was HOT! I can feel the tears welling up and I hear myself saying "I just need to suck it up and cut it." I'm not sure, but I think I might have stamped my foot in frustration. My husband lays a hand on my arm and says "Well, hold on now. We just need to think about this a minute because I'm sure we can get it lined up."
He begins talking about pinning the corners & measuring diagonally and I start crying in earnest. He may as well have been speaking a foreign language for as much of that as I understood in that moment. But, as I have no ideas and I trust him with my life I say okay. I took a minute to blow my nose and drink some water, then asked him to explain again. And this is what we did.
We put a pin in each of the top corners of the quilt. Measured that distance (68"). Then we measured down the side of the quilt to the same distance on each side (78") and put pins in the bottom corners at the same width as the top measurement. So the pins were marking the quilt at 68 x 78. Then we took the two diagonal measurements and compared the numbers. Because they were not the same meant we had a parallelogram, rather than a rectangle. By moving each of the top pins over an inch, measuring the two diagonals again, moving the pins another 1/4 inch, we ended up with a rectangle. Once we were sure of the pin placement, we moved the tape to the inside of the pins and cut.
I was afraid, but I'll be darned if it didn't work. Even after sewing on the binding, those quilt corners all meet up. I hope I've explained this fairly well and that even without pictures it can help you if you find yourself in a similar situation!
And that is the true story of an everyday hero who made a quilt square and saved his wife's sanity ♥
Monday, June 11, 2012
Another garden project
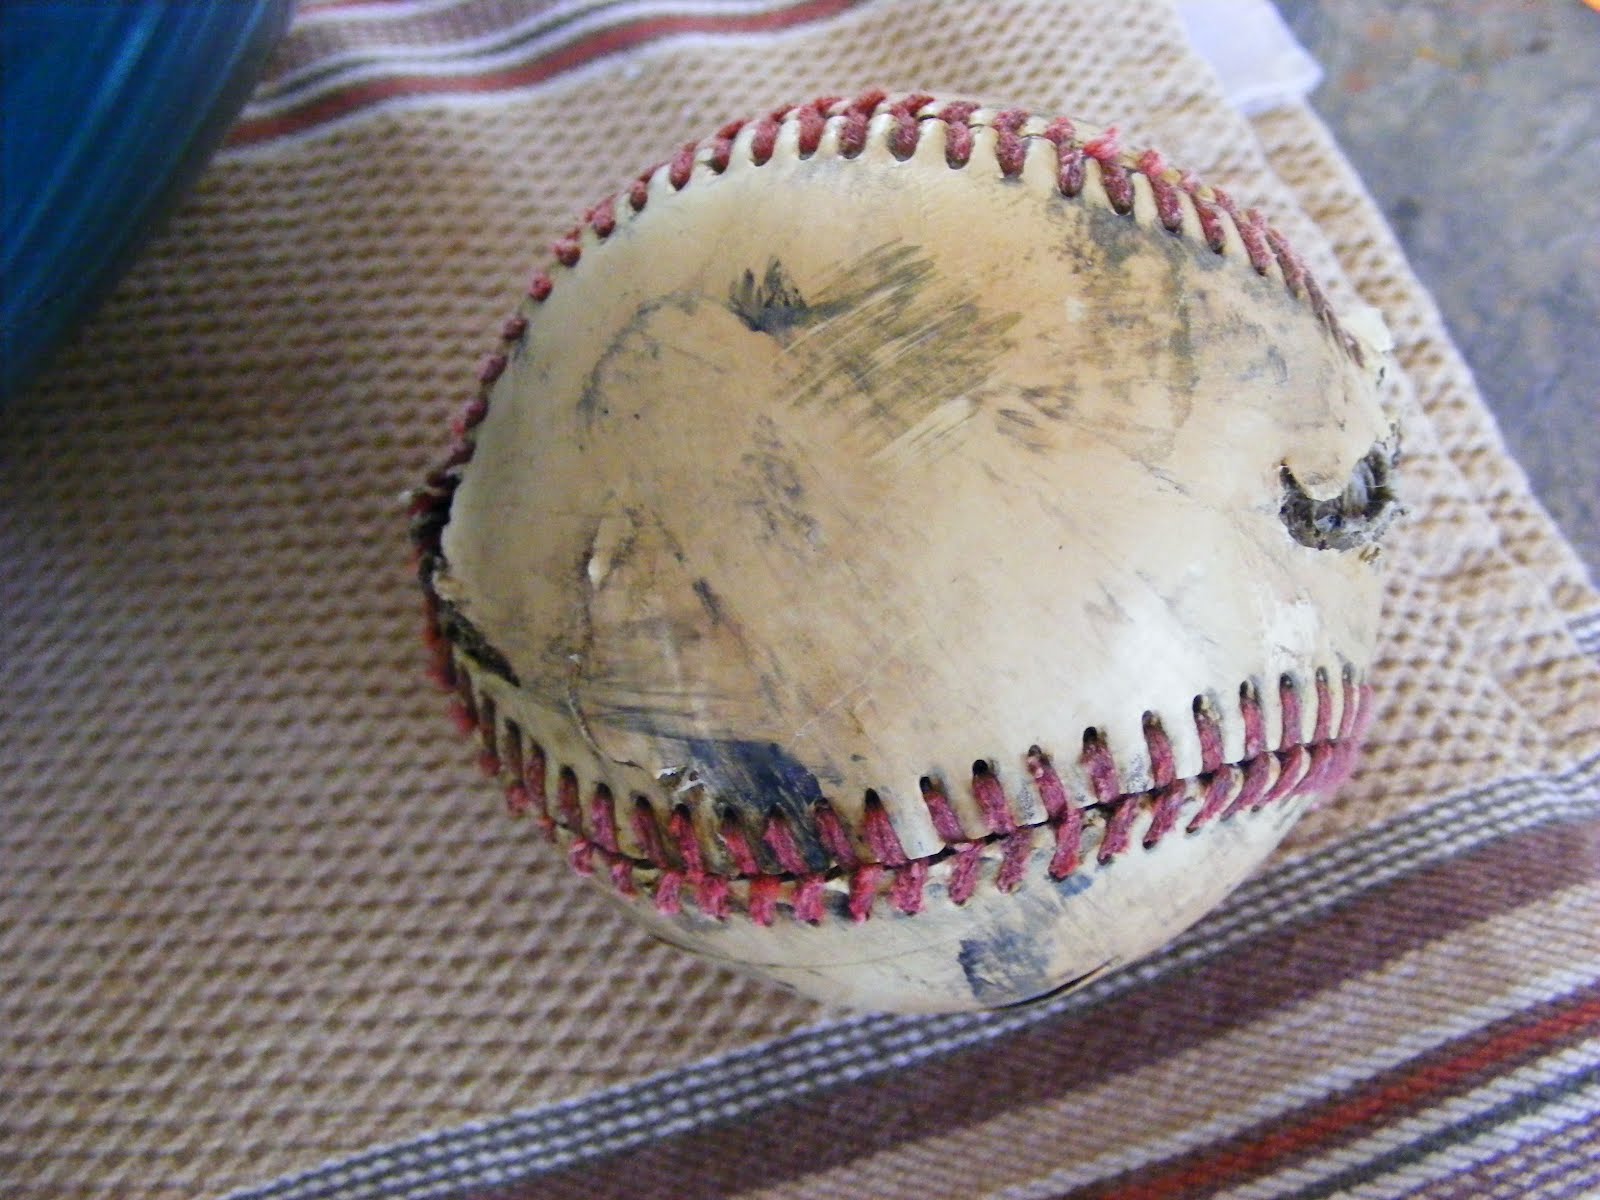


 Have you noticed my obsession with garden art? I don't really know why, and I'm not sure that it matters, but I love unexpected stuff in the garden. This little project, completed much the same way as the bowling ball, now hangs in a walnut tree. Things hanging in trees = ♥. To the baseball covered in stones, I added an eye screw and some jack chain.
 Have you ever seen a more beat up, well loved baseball? Me, either! I decided to try gluing to it and it worked out fairly well. There are a couple of pretty large gashes that were tricky to cover, but with enough glue all things are possible ;)
You can still see the baseball through the gaps and while I could have added another layer to hide that, I prefer it this way. The color of the baseball is a perfect backdrop to the creamy white stones and being able to see the stitching gives it humor and that makes it even better!
With graduation surrounding me, I've uncovered some wonderful quotes, which can be applied to your life at any time whatsoever...
“Your time is limited, so don’t waste it living someone else’s life. Don’t let the noise of others’ opinions drown out your own inner voice. And most important, have the courage to follow your heart and intuition. They somehow already know what you truly want to become. Everything else is secondary... Stay hungry. Stay foolish.” – Steve Jobs
Friday, June 8, 2012
Fun in the garden!
Seriously... Pinterest.

I discovered a photo of a bowling ball covered with pennies set out in a garden on Pinterest this week. In love. I was totally in love. Off to the thrift store I went and found this green ball. Because it was green, I thought of these flat marbles that have been in my studio for years (yes, years.)
  They are a milky green color and I mixed them with some clear ones. I used E6000 glue to adhere them. After some trial and error I found that if I put some glue on the ball and some on the marbles and let them sit for about 3 minutes, it improved the 'stick' and I had less slippage. Keep in mind though there will be slippage as you are trying to glue stuff to a round surface. It's fairly labor intensive. I glued on about half, let those dry before attempting the other half. I periodically checked on the marbles adjusting as necessary any that slipped out of place.
Funny story about this is that I thought I might be on the cutting edge as far as gluing these flat stones to a bowling ball, but no... After I began the process, while waiting for glue to dry, I started looking on the web. Lots of people sticking lots of things to bowling balls. On my list to try: pennies, marbles, buttons, sea glass.
Anyway, I love garden ornaments. I have all kinds of things in and around the plants and flowers, hanging from trees. This is the finished project in it's new home under a blue hosta. My goodness doesn't that look good! Wait, that looks like it needs another or 5 or 17 more. Now to find those bowling balls... ♥♥♥

I discovered a photo of a bowling ball covered with pennies set out in a garden on Pinterest this week. In love. I was totally in love.
 Off to the thrift store I went and found this green ball. Because it was green, I thought of these flat marbles that have been in my studio for years (yes, years.)
  They are a milky green color and I mixed them with some clear ones. I used E6000 glue to adhere them. After some trial and error I found that if I put some glue on the ball and some on the marbles and let them sit for about 3 minutes, it improved the 'stick' and I had less slippage. Keep in mind though there will be slippage as you are trying to glue stuff to a round surface. It's fairly labor intensive. I glued on about half, let those dry before attempting the other half. I periodically checked on the marbles adjusting as necessary any that slipped out of place.
 Funny story about this is that I thought I might be on the cutting edge as far as gluing these flat stones to a bowling ball, but no... After I began the process, while waiting for glue to dry, I started looking on the web. Lots of people sticking lots of things to bowling balls. On my list to try: pennies, marbles, buttons, sea glass.

Anyway, I love garden ornaments. I have all kinds of things in and around the plants and flowers, hanging from trees. This is the finished project in it's new home under a blue hosta. My goodness doesn't that look good! Wait, that looks like it needs another or 5 or 17 more. Now to find those bowling balls... ♥♥♥
Wednesday, June 6, 2012
2nd Graduation this year!
We've celebrated our 2nd graduation this year. My youngest graduated from High School just this weekend. Amazing! Simply Amazing.  He is bright, passionate, artistic, articulate, deeply compassionate and in my totally biased opinion, completely adorable! I, of course, cried. There are just so many emotions going on all the same time that it just wells up and spills over.
The ceremony was great. Not too long, not too short. The variety of the speakers, involvement of the students, songs by the senior choir members - all contributed to a 'just right' event. The weather was beautiful as well. We couldn't have asked for more. I'm one proud mama. Now it's off to college! Sigh, sniffle, joy.
I was re-reading this post and the two or three previous to it and realized how often I used the word amazing. Of course, these most recent posts have been about my sons and to be quite frank, they are amazing. They are not perfect and sometimes they drive me crazy but the truth is they are two of the most incredible, complex, loving, unique people I've ever known. At this point I feel I need to justify what others will read as bragging, but I'm not claiming their amazing-ness is a direct reflection of me. I totally get that who they are and who they are becoming is all about them and the miracles that God set in motion the day they were born. So yes, I feel pride for, but not ownership of, their accomplishments. I know I am one lucky woman to be here to witness these everyday miracles!
 He is bright, passionate, artistic, articulate, deeply compassionate and in my totally biased opinion, completely adorable! I, of course, cried. There are just so many emotions going on all the same time that it just wells up and spills over.
 The ceremony was great. Not too long, not too short. The variety of the speakers, involvement of the students, songs by the senior choir members - all contributed to a 'just right' event. The weather was beautiful as well. We couldn't have asked for more. I'm one proud mama. Now it's off to college! Sigh, sniffle, joy.
I was re-reading this post and the two or three previous to it and realized how often I used the word amazing. Of course, these most recent posts have been about my sons and to be quite frank, they are amazing. They are not perfect and sometimes they drive me crazy but the truth is they are two of the most incredible, complex, loving, unique people I've ever known. At this point I feel I need to justify what others will read as bragging, but I'm not claiming their amazing-ness is a direct reflection of me. I totally get that who they are and who they are becoming is all about them and the miracles that God set in motion the day they were born. So yes, I feel pride for, but not ownership of, their accomplishments. I know I am one lucky woman to be here to witness these everyday miracles!
Thursday, May 24, 2012
Graduation Gift!
My oldest has graduated college. Sigh. Sniffle. Wide, wide, grin.
I really can't explain how amazing and wonderful and amazing it's been watching him progress through his college career. Amazing. I'm repeating myself, but I'll assume I'm forgiven since this has been one incredible year.
To celebrate him, I made a quilt. First, let me say I've never made anything of this magnitude before. I've made small quilts, as gifts, before. Small, as in wall hangings. And I've learned that quilting is not my special gift. Or should I say, making the seams line up is not my special gift. So, when I got it into my head that only a quilt would do to mark such an occasion some were skeptical. Okay, I was skeptical. But, the idea would not go away.
I have seen some amazing quilts in the blogging world and was inspired by strip quilts. No need to match the seams! After some perusal, consideration and pondering I jumped in with both feet. This was my plan... My graduate is a music major so I intended to buy any and all music themed fabric. I've used this type of fabric before and know it's usually black and white, so black and white was my planned color scheme. I was also going to embroider panels with images and words personal to him.
 Two weeks before graduation (no that is not a joke - two weeks!) I ventured to my favorite fabric store and started picking fabric. Seriously no idea how much I needed. I focused on fat quarters because of the variety of fabrics available in the colors I wanted. I didn't want anything too feminine, but other than that I picked every single black, black and white fabric they had. I added in some gray fabric and you will see in the photos some orange fabric, which I'd planned to use as accent, but as the quilt was coming together, the orange just wasn't working. So out it went.
 I stood in an aisle with all my choices spread across a flat surface mixing and matching until I found the most appealing balance of light to dark. It took some time, but was well worth it.
I found some music fabric at the store, but not enough, so I started looking online and found Fabric.com with several amazing fabric choices that I ordered. The arrived quickly and were top quality. I give them 2 thumbs up!
I started embroidering. My sewing machine is a combination sewing/embroidery, so I wanted all the embroidery to be finished before I started sewing. It took the better part of two days - I kid you not. The most challenging was getting his name as large as I wanted (which was significantly larger than my hoop) and lined up. This was especially tricky when factoring in the letter size and how a smidge on a computer screen translates into a noticeable difference on the finished product. Yikes! It was tricky, but so worth it to have his entire name in 2" letters across the quilt.
 As I was embroidering images, I added silver metallic as an accent and it rocked. Just the right amount of punch. I embroidered his name, grad info, and then a ton of images of things important to him now and in the past. I decided to embroider only on white fabric and used a gray to black ombre thread, black thread, and silver thread. The white makes the embroidery pop and is the perfect foil for all the busyness in the fabrics.
It was during the embroidery process that I settled on 3 inch strips which would have a 2.5" finished size. Most of the images fit inside this parameter, but some did not. Once the fabrics were washed and ironed, I began cutting the strips. The fat quarters were fairly straight forward. I folded them all the same way, so the strips were roughly the same length. I decided to cut the full yards, ordered online, the full width of the fabric as they would help balance out his name panel, which stretches about 30 inches across. I did some math to determine how many strips I needed - basically, number of rows needed for the length I wanted multiplied by the number of strips it would take to make the row the width I wanted. I was counting on leftover fabric to be used for the back, which I did not want to strip piece, so I erred on the side of too few and ended up cutting three more strips to finish the quilt.
Next came seaming everything together. I just began picking up strips and sewing, adding embroidery as I went. I was flying by the seat of my pants and I thoroughly enjoyed the process. About half way through I thought, "hmmm... maybe I should see how these will look together." Yes. Half way. Can you tell I'm a novice or what? So, I cleared some space in the studio and started laying them out. I could immediately see which strips all roughly the same length, those pesky seams were awfully close together. Dang. If I left it that way, it would look like I couldn't match a seam to save my life, which though true I did not want the quilt to look like that. So, I began adding a little here and there or cutting through a strip to sew to something else.
 A little trial and error, but in the end the rows looked fantastic. The embroidery well distributed. The fabrics evenly used, not touching itself, and a good flow from lights to darks. The top went together quite well. Fairly quickly (faster than the embroidery) and I was feeling pretty excited. I used the leftover music fabric for the back, but it wasn't quite enough. Into the stash I went. I found two black and white fabrics (which I buy if I find a deal as they are so versatile for the kinds of projects I make). One a harlequin and one a stripe. I decided to use the harlequin as the middle of the back. Though the rows of diamonds aren't quite straight, the overall effect is pretty cool.
 The stripe became the binding. There is a video on YouTube showing how to fold 18" of fabric to get yards and yards of binding. I was able to bind this entire quilt by doing this process twice so with 1 yard of fabric. And it was easy. I highly recommend!
I also used another YouTube video for learning how to machine quilt a large quilt on a standard sewing machine. Seriously, you gotta love YouTube and the amazing people who share their knowledge! Basically, when all the layers were together, I pinned and pinned and pinned - with safety pins. Then I rolled up the quilt, put the walking foot on, and stitched along each seam from side to side. Now this was more complicated than it sounds as there was so much fabric. I'd stitch, pause and adjust, stitch some more. It took a long time and my arms got quite a work out! But, of all the steps thus far, this went the quickest although it was 4 hours worth of work.
 Next came squaring up the thing. There is a whole nightmare story on how to square up a quilt, which someday I will document because I could not find anything helpful anywhere when I needed to figure out how to square it up. No book, no video, no blog, no message board - nothing. While I'm definitely a novice, I know I am not the only one who has ever had to try and square up a quilt project. So look forward to that. All I will say right here about it is Thank God for my husband! We squared it up, then using the yards and yards of binding, I attached that to the front of the quilt, using the walking foot. Then I hand sewed the binding to the back of the quilt. I did not get that part quite finished before graduation day and so was stitching for a few days after that.
So this is the finished project. I am pleased and proud of the project, but more importantly I'm thrilled because my son loves it, because it marks a big life event, and because he will be wrapped in love each and every time he uses it. ♥

I really can't explain how amazing and wonderful and amazing it's been watching him progress through his college career. Amazing. I'm repeating myself, but I'll assume I'm forgiven since this has been one incredible year.
To celebrate him, I made a quilt. First, let me say I've never made anything of this magnitude before. I've made small quilts, as gifts, before. Small, as in wall hangings. And I've learned that quilting is not my special gift. Or should I say, making the seams line up is not my special gift. So, when I got it into my head that only a quilt would do to mark such an occasion some were skeptical. Okay, I was skeptical. But, the idea would not go away.
I have seen some amazing quilts in the blogging world and was inspired by strip quilts. No need to match the seams! After some perusal, consideration and pondering I jumped in with both feet. This was my plan... My graduate is a music major so I intended to buy any and all music themed fabric. I've used this type of fabric before and know it's usually black and white, so black and white was my planned color scheme. I was also going to embroider panels with images and words personal to him.


I found some music fabric at the store, but not enough, so I started looking online and found Fabric.com with several amazing fabric choices that I ordered. The arrived quickly and were top quality. I give them 2 thumbs up!
I started embroidering. My sewing machine is a combination sewing/embroidery, so I wanted all the embroidery to be finished before I started sewing. It took the better part of two days - I kid you not. The most challenging was getting his name as large as I wanted


It was during the embroidery process that I settled on 3 inch strips which would have a 2.5" finished size. Most of the images fit inside this parameter, but some did not. Once the fabrics were washed and ironed, I began cutting the strips. The fat quarters were fairly straight forward. I folded them all the same way, so the strips were roughly the same length. I decided to cut the full yards, ordered online, the full width of the fabric as they would help balance out his name panel, which stretches about 30 inches across. I did some math to determine how many strips I needed - basically, number of rows needed for the length I wanted multiplied by the number of strips it would take to make the row the width I wanted. I was counting on leftover fabric to be used for the back, which I did not want to strip piece, so I erred on the side of too few and ended up cutting three more strips to finish the quilt.
Next came seaming everything together. I just began picking up strips and sewing, adding embroidery as I went. I was flying by the seat of my pants and I thoroughly enjoyed the process. About half way through I thought, "hmmm... maybe I should see how these will look together." Yes. Half way. Can you tell I'm a novice or what? So, I cleared some space in the studio and started laying them out. I could immediately see which strips all roughly the same length, those pesky seams were awfully close together. Dang. If I left it that way, it would look like I couldn't match a seam to save my life, which though true I did not want the quilt to look like that. So, I began adding a little here and there or cutting through a strip to sew to something else.


I also used another YouTube video for learning how to machine quilt a large quilt on a standard sewing machine. Seriously, you gotta love YouTube and the amazing people who share their knowledge! Basically, when all the layers were together, I pinned and pinned and pinned - with safety pins. Then I rolled up the quilt, put the walking foot on, and stitched along each seam from side to side. Now this was more complicated than it sounds as there was so much fabric. I'd stitch, pause and adjust, stitch some more. It took a long time and my arms got quite a work out! But, of all the steps thus far, this went the quickest although it was 4 hours worth of work.

So this is the finished project. I am pleased and proud of the project, but more importantly I'm thrilled because my son loves it, because it marks a big life event, and because he will be wrapped in love each and every time he uses it. ♥
Friday, April 20, 2012
Geez...
Where does the time go?
I have two graduates this year. Two. Who thought that would be a good idea? Well, anyway, it's been a little frenzied here, with all the preparations for not one but two graduations, two gathering/parties, not to mention all the other amazing things that happen during senior years.
Okay, want to update you on the no shampoo effort. It really wasn't working for me and I am back to using shampoo. I gave it a strong effort, but my results were inconsistent. One day the hair would be great, the next 5 would be varying degrees of not good. I reached the breaking point when it seemed as if every hair on my head was fighting against every other one. This went on for 5 days, getting progressively worse - picture if you will Monica from Friends in the episode where they went to a tropical locale and her hair just got bigger and bigger. This is what would happen throughout the day. It would start off well, but as the day progressed the hairs were just more and more agitated or distressed or I don't really know but on the day of my son's recital I threw in the towel.
So I'm back to shampoo and my hairs are friends again. I do use the baking soda once a week to get a deep down clean. Nice side benefit is that working the baking soda in gives your head a nice massage! My husband, who had joined me in the adventure, let out a sigh of relief when I said I was giving up. He had similar issues, but was going to stick with me! What a guy! Am I right?
Spring is here and the gardens are calling, so I'm off to spruce up the place for those parties I mentioned earlier!

I'm not sure what these little flowers are, but they are beautiful. They are a bulb of some kind and like most bulbs arrive and depart quickly.
Monday, April 2, 2012
Senior Recital Vest
My oldest is a musician and had his senior recital Saturday. First, little surreal that is graduating college this year. But that is another post, I think. This post is about the vest...
 Some time ago, we found this fabric at JoAnn's. It really is the most beautiful fabric, with big elaborate paisley shapes in silver and black. The photos do not do it justice. It's shimmery rather than shiny and with all the intricate stitching it catches the light with every movement. He thought it would make a great vest and so we purchased. I'd intended to give it to him earlier, but with one thing and another (the broken arm, primarily), it was set aside.
As he is away at college most of the time, getting new measurements is more tricky than it ought to be. Okay, okay, so I don't always remember everything either. Anyway, he was home on spring break two weeks ago, so I measured, on Sunday as he was leaving to go back to school, but the important part of this story is I remembered to measure while he was still in the house. As he is a tall bear of a man, standard patterns just don't work. I did find a big and tall pattern a year or two ago and with a few alterations, we were good to go. The vest pattern called for a middle back seam, but because the pattern of the fabric is so distinct (and beautiful) I did not want that, so I fiddled with the placement of the back piece on a fold to create the least extra fabric. It worked out really well actually.
 I'm not a professional seamstress and the only class I've taken was 7th grade Home Ec. All I know about sewing I've learned from books and television programs and trial and error. So every time I have a success, I feel ecstatic.
Anyway, the point to this story is that the vest turned out great. My son looked great and most importantly, he felt good in it.
Oh the recital? It was the most amazing... You know, there are events that change who you are and who you will become... That recital was one of those events for my son. He was challenged in a way that he did not think he could accomplish. To watch him do something he thought was beyond his reach... I knew I was witnessing a miracle.

As he is away at college most of the time, getting new measurements is more tricky than it ought to be. Okay, okay, so I don't always remember everything either. Anyway, he was home on spring break two weeks ago, so I measured, on Sunday as he was leaving to go back to school, but the important part of this story is I remembered to measure while he was still in the house. As he is a tall bear of a man, standard patterns just don't work. I did find a big and tall pattern a year or two ago and with a few alterations, we were good to go. The vest pattern called for a middle back seam, but because the pattern of the fabric is so distinct (and beautiful) I did not want that, so I fiddled with the placement of the back piece on a fold to create the least extra fabric. It worked out really well actually.

Anyway, the point to this story is that the vest turned out great. My son looked great and most importantly, he felt good in it.
Oh the recital? It was the most amazing... You know, there are events that change who you are and who you will become... That recital was one of those events for my son. He was challenged in a way that he did not think he could accomplish. To watch him do something he thought was beyond his reach... I knew I was witnessing a miracle.
Monday, March 26, 2012
Spring has arrived...
We've had the warmest spring opening on record, forcing all the flowering trees into bloom right now. Tonight we are predicted to have a hard frost, so I've just been running around the out of doors (oooooo cold!) snapping pictures to preserve the blooms that will be affected.  The forsythia this year is stunning! Vibrant yellow blooms packed onto the branches. It really looked best yesterday, but I didn't get that picture taken. It's starting to drop it's blooms, which look so beautiful in the green grass it's like a bonus gift the blooms give. I planted these around an electric pole in our yard and only trim when absolutely necessary (to save a lawn mowers eye, for instance). I much prefer to let the forsythia grow naturally, as mother nature knows what she is doing. Amazing!
"There is no remedy for love but to love more." Henry David Thoreau

"There is no remedy for love but to love more." Henry David Thoreau
Thursday, March 22, 2012
No Shampoo Update
I'm catching up for a couple of days... Yesterday began much as the previous days had with me not completely satisfied with the status of my hair. Limp, dull, bummer. After work I decided to shower again. This time I made a slurry of baking soda and water, 1/4 cup of baking soda with just enough water for it to swirl around. I dumped the entire contents on the top of my head and gave it a good rubbing in all over my scalp. Rinsed thoroughly and things were definitely better! Woot. Not perfect, but there was something like shine and bounce to my hair.
This morning, I repeated the entire process, 1/4 cup baking soda with about 1/2 cup of water (perhaps less)... It's perfect. My hair is happy and so am I! It looks good, healthy, and clean! I couldn't be happier. I didn't even dry it this morning, which I've typically done to give my fine hair some lift. But I didn't need it this morning. No drying time, no hairspray. This just gets better and better.
I think I've crossed the 'transition' line and will back down the amount of baking soda at this point as 1/4 c is quite a bit.
Tuesday, March 20, 2012
Chiffon Poncho!
I saw a chiffon poncho on a clothing website and fell in love. It was, however $30. Depending on your clothing budget $30 may or may not be a lot. For me, an experienced seamstress, it was too much. I buy about half of my clothing, but I rarely buy anything I can duplicate unless it is cheaper to buy than make, yes that does happen.
Searching the net, I discovered this pattern, which was similar enough that I was off and running. Don't be mislead by the photo provided, instead of a curved poncho the directions are for a rectangle. Lucky for me, it was what I wanted. I did round the corners to make sewing the rolled hem easier.
Though the original had a bias tape made from the same chiffon around the hem and neck opening, I opted for a rolled hem. I have found it to be easy to do and worth the effort. Rolled hems disappear more than a bias taped hem and this lends itself very well to chiffon. I make it on my traditional sewing machine as I haven't mastered it on the serger.
This is my final product. The picture really doesn't do the fabric justice. The background is shear and the rectangles you see are opaque and shimmery and there is a gold thread very subtly woven in.
I purchased 1 1/2 yards of chiffon on sale for $11.69 total. It took about 20 minutes to trim to size, cut the neck hole and sew. No joke. Because this fabric has such strong horizontal and vertical lines I chose to trim all four sides so the lines would be true and not distracting. For the rolled hem, follow your sewing machines guidelines. Test it on scrap fabric. From the 1 1/2 I purchased I had several inches left over after trimming to size. This enabled me to get the stitch length and thread color right.
Chiffon likes to unravel some and it will show from the rolled hem. I've worn my poncho three times since I made it and have trimmed one or two threads each time.
Chiffon gets a bad rap, because it is slippery and can be difficult to sew. My advice, try it. Use the right needle. Take your time. It will work or it won't, but there isn't anything scary in the process. Just give it a go. You might just discover something wonderful. :)
Searching the net, I discovered this pattern, which was similar enough that I was off and running. Don't be mislead by the photo provided, instead of a curved poncho the directions are for a rectangle. Lucky for me, it was what I wanted. I did round the corners to make sewing the rolled hem easier.
Though the original had a bias tape made from the same chiffon around the hem and neck opening, I opted for a rolled hem. I have found it to be easy to do and worth the effort. Rolled hems disappear more than a bias taped hem and this lends itself very well to chiffon. I make it on my traditional sewing machine as I haven't mastered it on the serger.
This is my final product. The picture really doesn't do the fabric justice. The background is shear and the rectangles you see are opaque and shimmery and there is a gold thread very subtly woven in.

I purchased 1 1/2 yards of chiffon on sale for $11.69 total. It took about 20 minutes to trim to size, cut the neck hole and sew. No joke. Because this fabric has such strong horizontal and vertical lines I chose to trim all four sides so the lines would be true and not distracting. For the rolled hem, follow your sewing machines guidelines. Test it on scrap fabric. From the 1 1/2 I purchased I had several inches left over after trimming to size. This enabled me to get the stitch length and thread color right.
Chiffon likes to unravel some and it will show from the rolled hem. I've worn my poncho three times since I made it and have trimmed one or two threads each time.
Chiffon gets a bad rap, because it is slippery and can be difficult to sew. My advice, try it. Use the right needle. Take your time. It will work or it won't, but there isn't anything scary in the process. Just give it a go. You might just discover something wonderful. :)
No Shampoo Update
It's day 5. It's better than yesterday, but my scalp is quite itchy and more oily than I feel comfortable with. When you look at my hair it doesn't look greasy, more like I have some sort of product in it to keep it in place.
Using more baking soda helped today. My hair is shoulder length and very full. The lack of suds makes it difficult to know if I'm distributing the baking soda well enough. Using more baking soda improved the results. I rinsed incredibly well this morning as anyone who poo poo's "no shampoo" claims the harshness of baking soda on the hair, so I wanted to be extra sure I rinsed it out.
I'm trying to document all the results because when I was looking for help all I really found were recipes and vague remarks to the transition period. So this is my attempt to be more detailed.
Interestingly I've found people who use only water, just apple cider vinegar, or conventional conditioner. Some scalps produce more oils than others and age & activity are also factors in what will work for each person. So, keeping that in mind I am continuing on.
Monday, March 19, 2012
Year of Wonder...
2012 is the year of wonder in our house. We are trying new things, giving up some things, getting out into the world and being open to life. It's been pretty amazing so far! It's been wonderful to take a second before making a decision and factor in the Year of Wonder. I've said yes to things that I would have said no to and been utterly delighted. I've also said no to things when I was tempted or felt obligated to say yes and found freedom and joy.
One thing I'm trying this year is to reduce the amount of chemicals in our home. Ever looked at labels on your cleaning products? Lotions, moisturizers, cosmetics? You might be surprised by the number of chemicals, commonly called additives in your food! So, I'm reducing my dependence on products with a lot of chemicals. I am never a zealot (Pinterest aside) and not all chemicals or additives are bad, but I am being conscious of my purchasing choices because I can. And because this is the year of wonder!!
One example: Vinegar is an excellent cleaner/degreaser/antibacterial. It's easy to use and requires no special storage. I re-used the spray bottles from my previous kitchen cleaner. I use half vinegar/half water. It's great in the bathroom and kitchen. Tip: Spritz moderately heavy in the microwave, run on high for 30 seconds, then wipe clean.
I discovered on Pinterest a blog entry where the woman and her family began using baking soda in place of shampoo. I was intrigued. It would fit perfectly into my plan to replace chemical laden products with natural alternatives, so I began searching the web in earnest. Everything I found only encouraged me, so I am on day four of the switch. The first day my hair was awesome. Clean, soft, shiny. Woot! I was so happy. Day two, good but I noticed that by the end of the day I wanted to and did cleanse again. Also, my scalp is periodically tingly, not in an uncomfortable way at all, but obviously from the new regimen. Day Three, hmmm... Not great-flat, not so shiny, difficult to comb, oily feel as the day progressed, plus it's just not all that soft to the touch. Not straw like or anything, but definitely not like it used to be before this experiment. Day four, worse than day three as far as the oil goes. Hair was easier to comb and the ends feel soft and 'normal', but the oiliness near the scalp - not good. I was warned, but every blogger who tried this that there is a transition time. That hair and scalp exposed to the harsh ingredients in shampoo will need some time to adjust to the new protocol. But reading it and living it are two different things. So, I've decided to put some entries on the blog to help me remember this process and to help anyone else trying it. I was using 1 TBS baking soda in 1 Cup of water and using half of that volume per shower. As I said, the first day this worked amazingly well. After doing more researching, I will be trying 2 TBS in 2 Cups of water and using the entire amount tomorrow. This is a trial and error process. Like a puzzle = and I do enjoy a good puzzle!
Monday, March 12, 2012
Pinterest Obsession
I've discovered Pinterest and I'm obsessed. Seriously. So much to see, so much to inspire... And the ability to keep it all organized. To find something great and be able to pin it for a later time when you need it. Genius!
It's inspired me to give this blog another go around. I very much enjoy creating and this blog is a great place to track it. Plus, like everyone else I sometimes have things to say. So, after all this time I'm going to begin again.
Subscribe to:
Posts (Atom)